
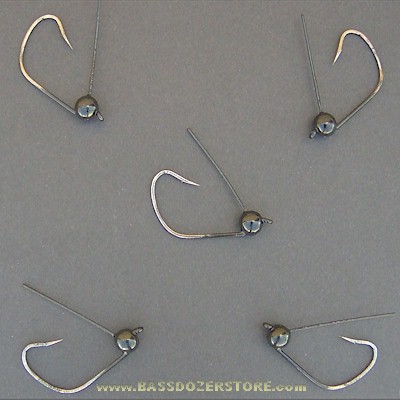
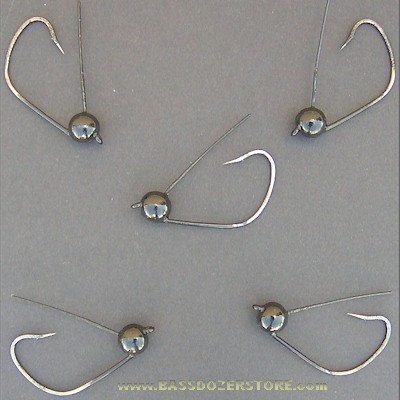
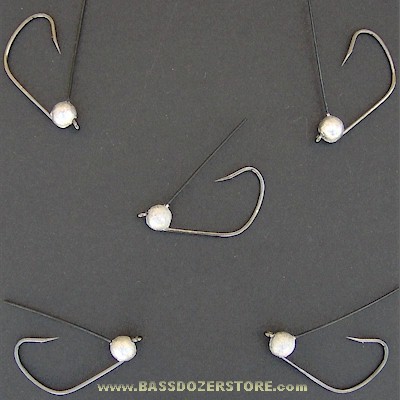
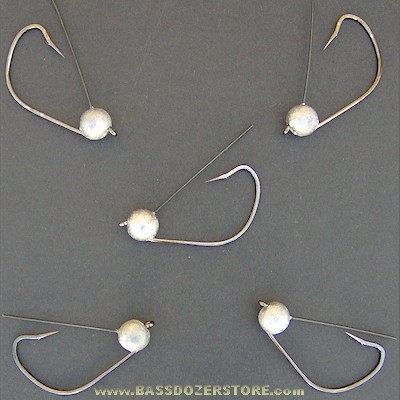
Bassdozer Wacky Jig Heads ~ 5 per pack
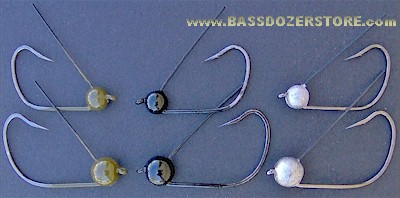
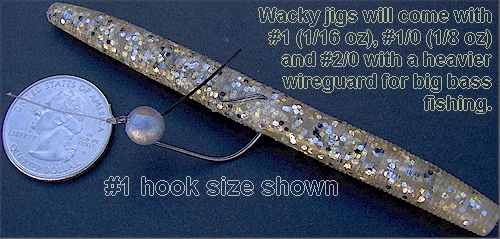
Two sizes are available: 1/16 oz with a #1 Gamakatsu hook and 1/8 oz with 1/0 Gamakatsu.
Note the flexible wire guard on the wacky jig comes a little longer than you may need. It is left longer so it can be used in the worst weeds, dense brush and the thickest cover if need be. However, in more open water, you can easily clip the wire shorter. Even clip it off completely in open water. Even without the wire guard, the wacky jig is quite snag-free in open water. Please enjoy!
What Worms to Use
Many worms will work on a wacky jig, depending on the mood of the fish.
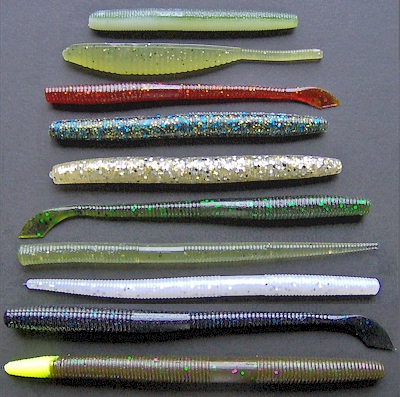
Yamamoto baits that work great with wacky jigs include (as shown from top down: Yamamoto's 9B Senko, 68L Shad Shape Worm, 7-series Kut Tail, 9J Senko, 9S Senko, 7L Kut Tail, 9P Senko, 9M Senko, 7C Kut Tail and 9-series Senko.
For adding action (shaking) on the fall, I like Yamamoto's thinner Senkos (9J, 9M, 9P) and smaller Kut Tails (7-series, 7L) because their slender diameters produce more wicked wiggling action when shaken.
For not shaking (simply a deadfall), I especially like the fatter 4" 9S Senko, the flagship 5" Senko (9 series) plus the 7C and 7X Kut Tails because the fat bodies offer more water resistance against the downward drag of the wacky jig, hence more squiggling and rocking movement generated from the increased water resistance simply on a dead fall.
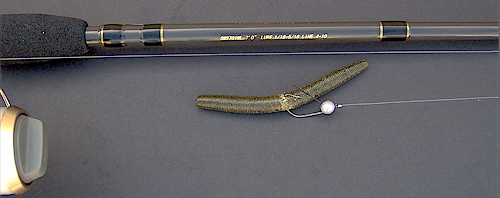
A wacky worm like the 4" 9S series Senko (shown above) will sink with an upward bow in the body as shown. The bait will sink like shown, vibrating both tips and rocking the entire body at times.
I also like Yamamoto's Shad Shape Worm on the deadfall. When rigged as shown below on a wacky jig, it will take your breath away the first time you drop it in the water. It looks more to me like a live minnow action than any bait I've ever seen.
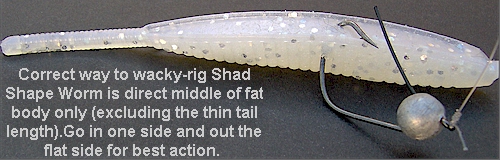
The photo shows the correct way to rig the Shad Shape Worm (color #935) on a wacky jig. It's hooked directly in the middle of the fat body section (excluding the thin tail length). Go in one side and out the flat top for best vibrating action. It comes to life when rigged like shown here.
The 3" 9B Senko is another bait that acts quite minnow-like on a wacky jig too. Both the Shad Shape Worm action and the 9B Senko action can only be described as a "minnow swimming on a treadmill" since the body swims, but does not move forward. Just have to see it to believe it. Other Yamamoto bait on wacky jigs also share this movement, but are just not as 'holy cow' as the two mentioned (Shad Shape Worm and 9B Senko).
Angler-Imparted Action
There is a lot of advice you hear about how to shake wacky jigs - and that's how the tactic is practiced in Japan - with lots of shaking. So look into that aspect of wacky jigging and decide whether shaking is good for you.
I personally don't shake a wacky jig. I just let it fall. It still works wonders even when not shaken.
When using a deadfall, there is one action, however, that you should apply every ten seconds or so, and that is to "pop" it. When it is jigged or popped once with the rod tip, the jig head is pulled above the bait, rolling the bait 180 degrees so that it flashes it's belly, which is a vulnerable action that tends to trigger a strike reaction right away. To get the most out of the belly flash response, I like to use laminate color wacky worms such as the color #927 (threadfin shad ) I designed for Yamamoto a few years ago. However, the belly flash action will work as a strike trigger even with a monotone (one color) worm with lots of metal sparkles that flashes ambient light when you pop it.

A wacky worm like the world-famous Yamamoto Senko (laminate color #927) will sink with an upward bow in the body as shown above. The bait will sink with an accentuated vibration in both tips and rocking the entire body at times as the ball head pendulums back and forth beneath. Then when the bait is 'popped', this causes the bait to roll or rotate like when you see a log rolling in water. This doesn't disturb the water that much, but what you get is a bright white belly flash. A very vulnerable signal - the belly flash of a baitfish in distress.
Wacky jig and 4-inch 9S Senko in color #326 (gold shiner) that I designed for Yamamoto a few years ago, has a heavy dose of silver and gold metal flake. When the wacky jig is popped, the jig rotates from below the worm to above the worm. It does a 180 when popped, causing the copious sparkles to suddenly flicker and shimmer (a 'belly flash' effect) which signals that this is a very vulnerable baitfish. It triggers instant, instinctive reaction strikes.
Wacky Jigs Work Best on Spinning Tackle
I like to use wacky jigs with 6, 8 and 10 pound test gear. Especially with wacky worms or wacky jigs, spinning gear is best for casting without tearing the wacky worm off the hook in mid-air. With baitcasting, you get a ferocious backlash when a wacky worm flies off the hook during a cast. So spinning is a "must have" for me with wacky jigs. You won't get a backlash with spinning gear when a wacky worm inevitably flies off the hook during a power cast.
The three spinning rods I use for 6, 8 and 10 pound test applications are rods made by Gary Yamamoto:
- Yamamoto 6'6" Rod Model. Yamamoto calls this a 'dropshot' rod, but it performs well with all 6 lb test tactics. I spool it with 6 lb test Yamamoto Sugoi fluorocarbon. This is the outfit I'll use for the calmest, clearest, most difficult conditions.
- Yamamoto 7' Medium/Light Model. If you want to use only one spinning rod for wacky jigs or wacky worms, this is it. Get a reel that comes with a spare spool. Pack 8 lb test Sugoi fluorocarbon on one spool, and 15 lb test PowerPro braid on the other spool.
- Yamamoto 7' Medium Rod. Fill one spool filled with 10 lb test monofilament. and the spare spool with 15 or 20 lb PowerPro braid.
Braid is really the way to go, but for many anglers, there's one looming concern with braid. It's the knot used to attach a trace of leader line at the business end. The critical point to many anglers is at the end of the fight, when a bass is at boatside, and the knot is out in between the reel and the fish. With a longer leader, say 15 feet, the knot's onto the reel spool at that point, so you're fighting on uninterrupted line. With anything shorter, the knot is out in between you and the fish, and you may be at the mercy of your knot-tying skill (or lack thereof) at that point. The key is to make a correct knot in the first place. In addition to tying a good knot, the longer the leader, the less stress there is on the knot. Distance or length of the leader dissipates or absorbs stress on the knot. From 10 to 15 feet is a sufficient distance to dissipate much of the stress that would otherwise be on the knot with a shorter leader.
Visibility of braid is a second concern, except in dingy water where it doesn't matter, you may tie direct. Otherwise, where it's possible that bass can see braided line, I really never go less than 5-6 feet with the leader in any case. On a perfectly still day and clear water, I'm probably going to use an 8, 10 or longer leader. On tough days when I can see bottom in 25 feet of water, you better believe I'll be using a 15 foot leader. Keep in mind, we're talking slow-moving wacky jigs here. Leaders for fast-moving reaction baits (topwaters, spinnerbaits and so on) rarely need to be that long.
Okay, to pick just one set-up for wacky jigs, I recommend Yamamoto's 7" medium/light rod with a 2500-series reel that fits your budget, one with a spare spool so you can easily switch spools to match the conditions at hand. You may want to consider one spool filled with braided line and an 8-15 foot Sugoi fluorocarbon leader, plus a second spool with 8 lb Sugoi fluorocarbon (no braid) for clear water where fish have visual acuity and you can lose your nerve with braid.
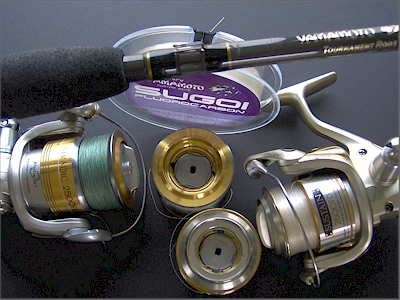
I am a big fan of Shimano spinning reels. For freshwater bass fishing, the Shimano 2500 series handles all of my spinning applications.
All Shimano 2500 series spinning reel models work swell. The quality is consistently high across all Shimano 2500 series models. Honestly, as far as I can tell, the main difference between models is price and budget. So you really cannot go wrong with whatever Shimano 2500 spinning reel you can afford, you should be pleased with the performance.
How NOT to Set the Hook
With the wacky jigs you see here, there is an extremely high hook-up ratio, incredibly close to 100% or as perfect a hook-up ratio as a lure can achieve. The trick is to simply tighten up on a fish until the fish pulls down and sets the hook itself.
There's an easy way to 'not set the hook' when you detest a pick-up. As a result, the hook slips behind the upper jaw or corner jaw hinge every time, resulting in an incredibly high hook-up ratio. Learn to NEVER set the hook, just let the fish pull down and set it. Practice makes perfect, and once you get the knack, you will land almost every fish with the hook right behind the upper jaw bone or right behind the corner hinge of the mouth. The hook acts like a "circle hook" in the case of these wacky jigs.
Here's a little more advice to describe how I like to (not) set the hook with these things...
You really need to get the fish at least clamping down or pursing its mouth down on it first to grip it. This is something you do by putting a little pull on the line, not really pull, almost holding the line and therefore the bait so the fish can't be in full, unfettered control of it. You need to get the fish to grip it tighter - best of all would be ideally moving down or away with it. Then you just pull back against that. It's almost like the fish will hook itself - most often dead center between the nostrils in the upper lip, not the corner of the mouth. Once you get the hang of it, you'll do it every time.
Don't Start out Fishing Wacky Jigs. End up Fishing Them
I often start fishing with another rod and lure to find fish first and to be able to cast out an area rapidly. However, I leave a spinning rod (preferably the Yamamoto medium/light model) on the deck at my feet, with the wacky jig ready to cast. This is either if I am in the front or back of the boat, I will have the wacky jig rod ready to pick up and cast. If I miss a hit, have a follow or have chasers, bring up a school or see fish on the graph, I drop the first rod ASAP and cast back with the wacky jig rod. At that point, I then actively fish the wacky jig rod, having found one or more fish on the electronics or on the other rod first.
Therefore, one of the big keys to me is to find fish first by other means, then start fishing the wacky jig. It is an incredible follow-up bait to anything else. If you learn to follow-up (practice makes perfect), you will add many more and bigger bass to your day's catch. I say bigger because you can cherry-pick the bigger chasers on the follow-up. It's as important to sense where the fish went when it left your view, and understanding what's on the bottom helps you determine that. Often, straight down under the boat is where they go, using the boat as a substitute for other cover. Often, chasers will not hit until the wacky jig hits bottom. So do not end a follow-up until the lure hits bottom. I'd reckon the bass feels the bait is easier to trap and pin it against the bottom rather than try to hit it in mid-water where it has 360 degrees to avoid the bass strike. Whatever the reason, a very high percentage of follow-up strikes happen when the bait hits bottom, even if it's 30 or more feet deep. So be patient, and once the line finally goes slack (meaning it hit bottom), set the hook!
Most anglers are not good at follow-up - and you'll never get good at it unless you deliberately spend time to train yourself how to do it. If you fish team tournaments, train each other. Practice, practice, practice following up every active fish with the wacky jig, and you'll score more. If one side of the livewell is empty, leave it running and one lid open. This way, any fish can be swung right into the livewell, and if you do not need to cull at that point, pick up the follow-up rod and instantly cast back. The window you have to get a follow-up bite may only last a few seconds. So you must be ready. The wacky jig and worm must already be ready. You must know the way you left the rod on the deck, that you don't have to untangle it first.
A key point that can't be stressed enough is to have the follow-up rod ready to fire back right away. If you have to fix the bait, fix the line or do anything else before casting, you're missing the moment when the fish is hot. When you lay the follow-up rod on the front or back deck, it has to be prepared to pick up and cast faultlessly without fumbling or adjusting anything. That's a big key.
Even when I have found a body of fish and settle into fishing the spot with a wacky jig, I rig a second wacky jig rod to follow-up the first wacky jig. Reason is, you will be pulling up hot chasers and even the entire school will come up with every fish you bring to boatside. You may not want to catch them all (well, maybe that would be nice) but you're certainly going to see some you would want that are bigger than others. So follow-up, follow-up, follow-up everything, even another wacky jig, either fishing by yourself or with a partner - that is the key to maximizing use of the wacky jig.
The price is for a pack of five (5) jig heads as shown below.

1/16 oz Wacky Jig ~ Green Pumpkin ~ Qty: 5 per pack

1/8 oz Wacky Jig ~ Green Pumpkin ~ Qty: 5 per pack
1/16 oz Wacky Jig ~ Black ~ Qty: 5 per pack
1/8 oz Wacky Jig ~ Black ~ Qty: 5 per pack
1/16 oz Wacky Jig ~ Unpainted ~ Qty: 5 per pack
1/8 oz Wacky Jig ~ Unpainted ~ Qty: 5 per pack
For pricing and current availability, please visit http://www.BassdozerStore.com.
Thank you for your business. May your next fishing trip be your best ever!
Regards,
Russ